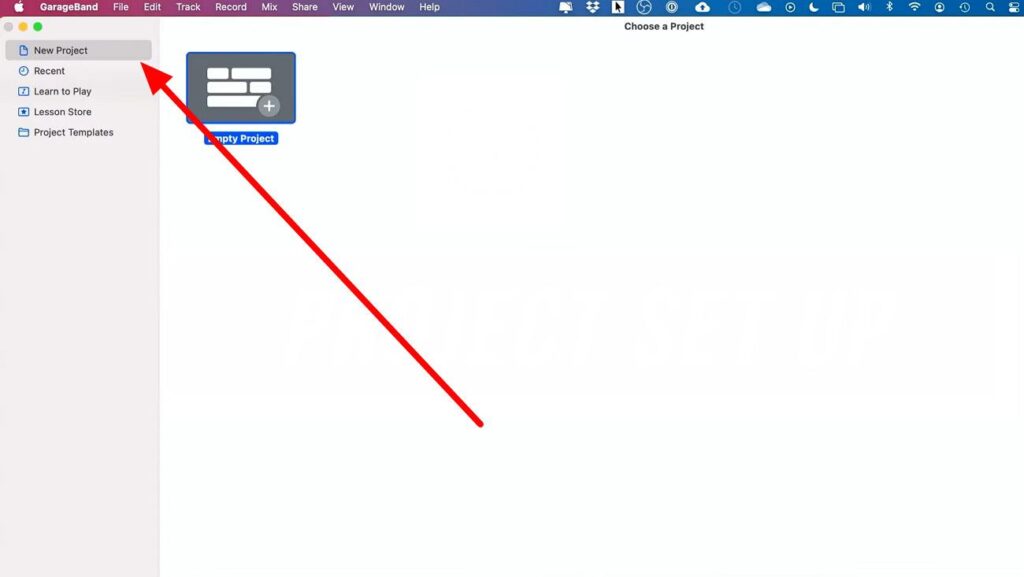
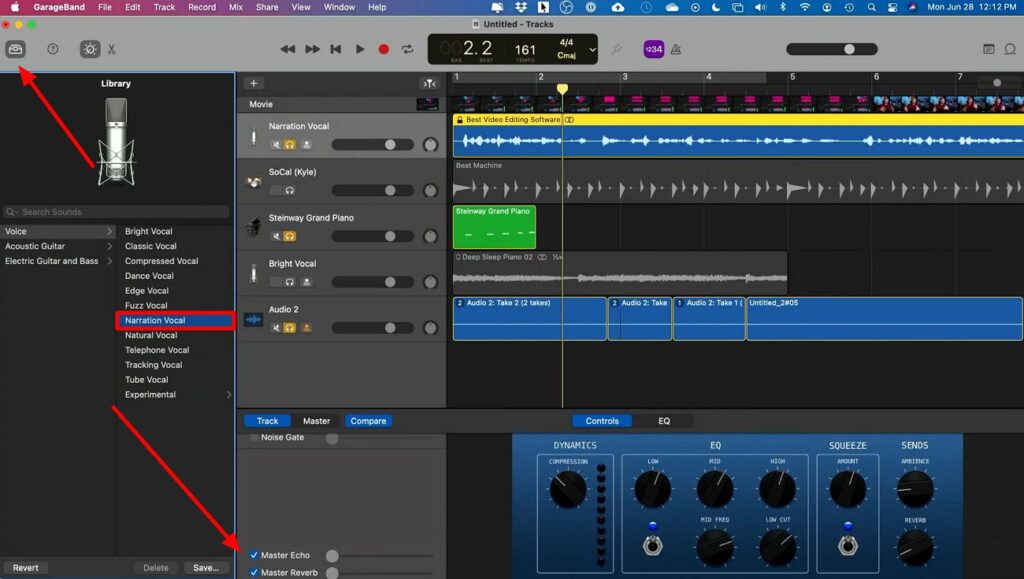
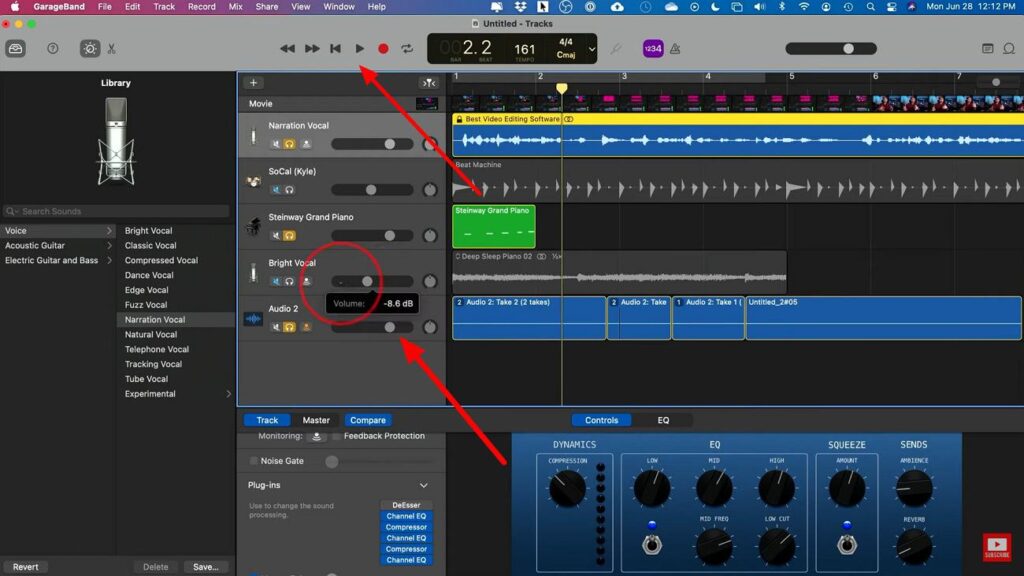
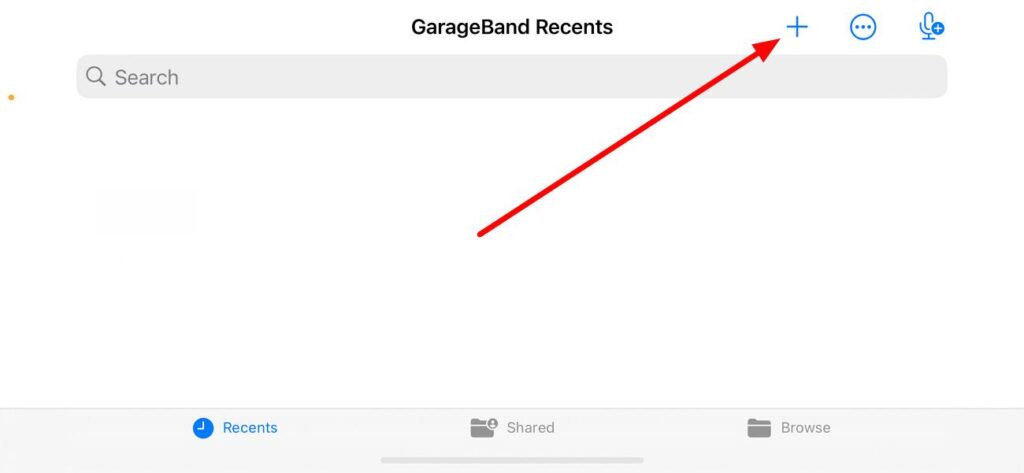
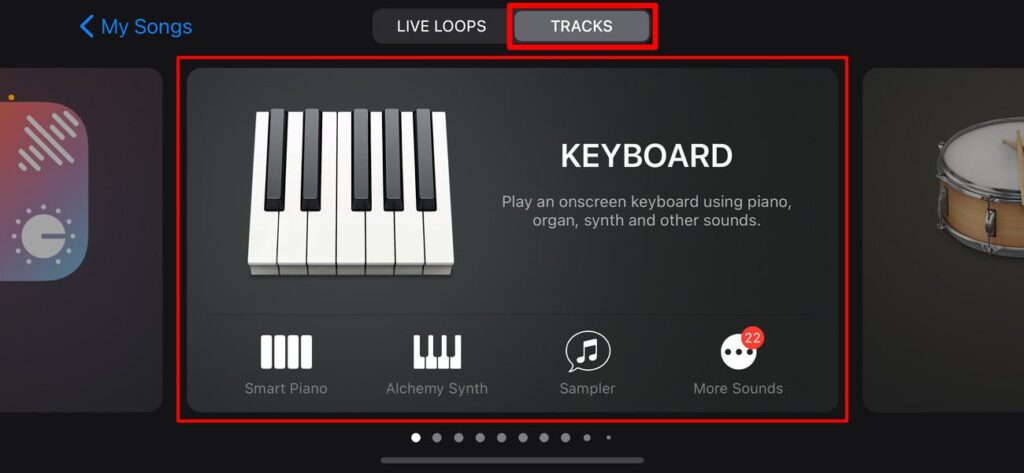
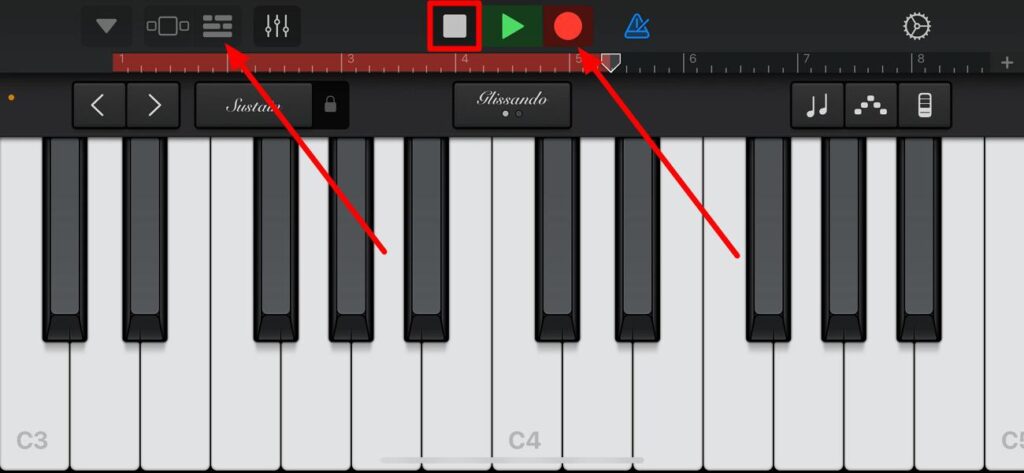
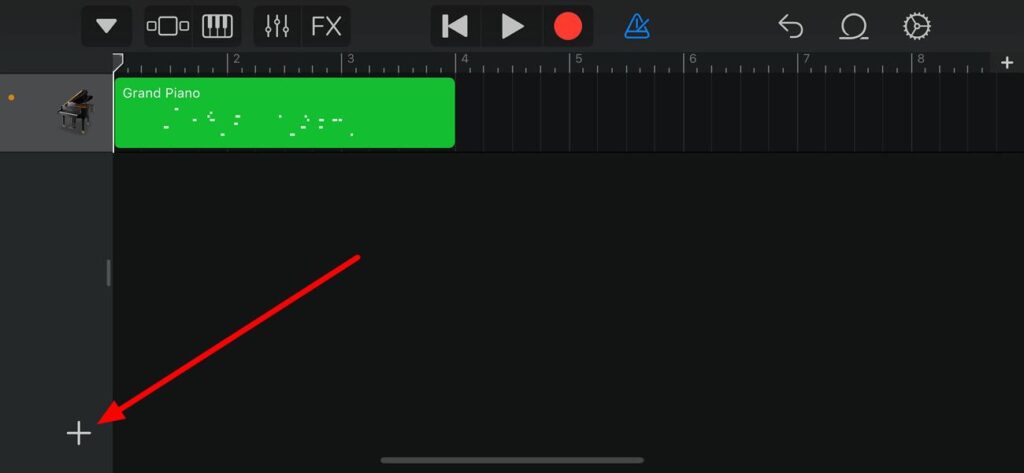
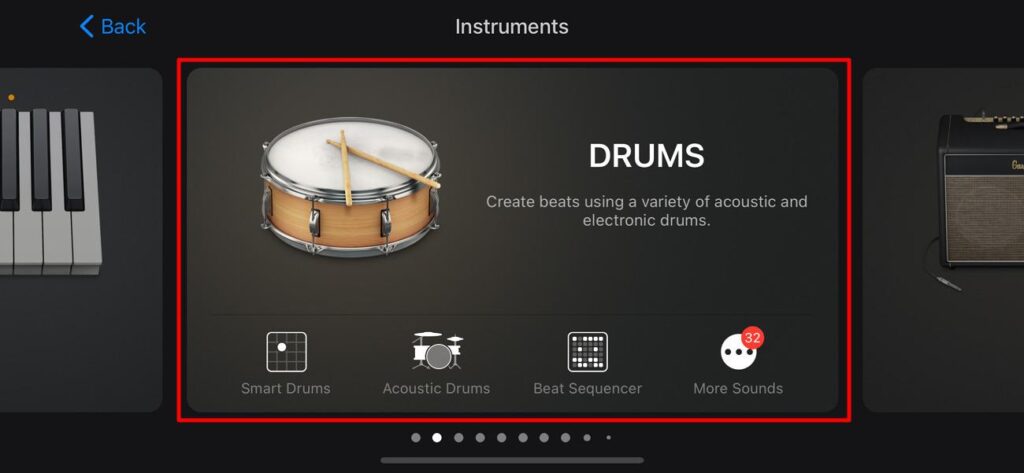
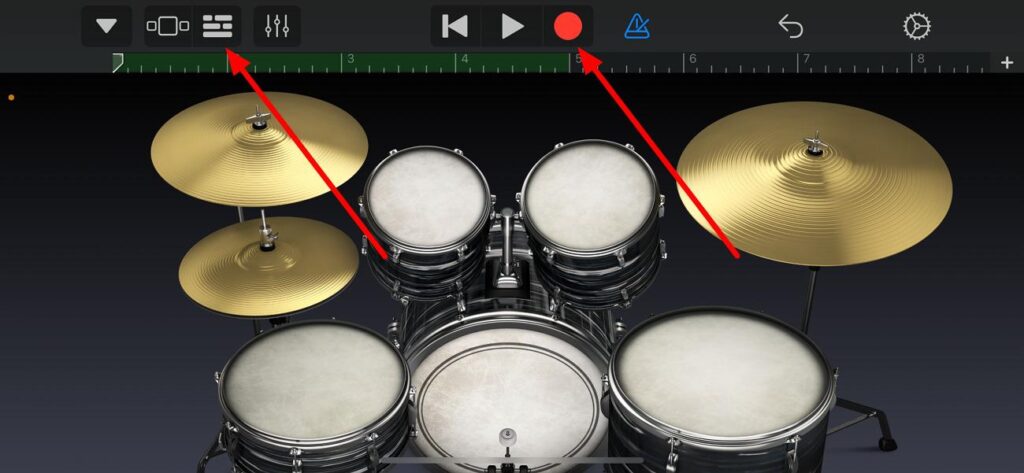
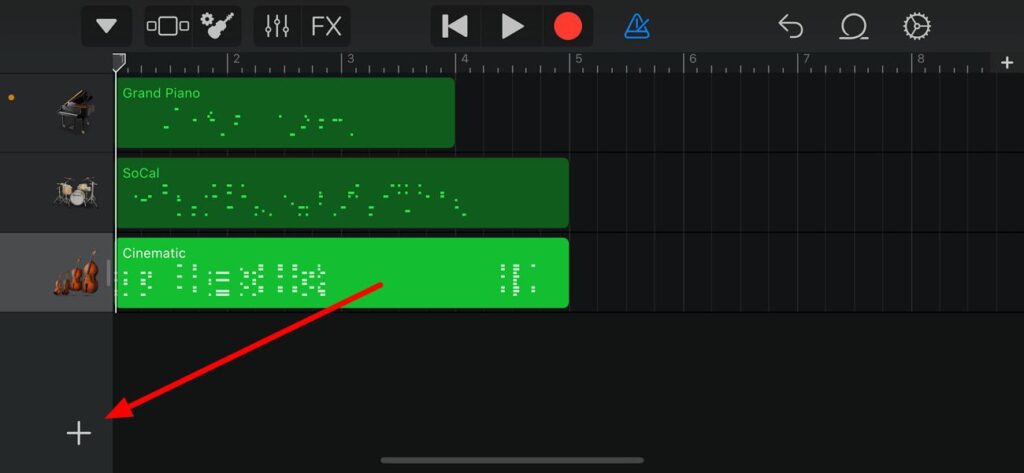
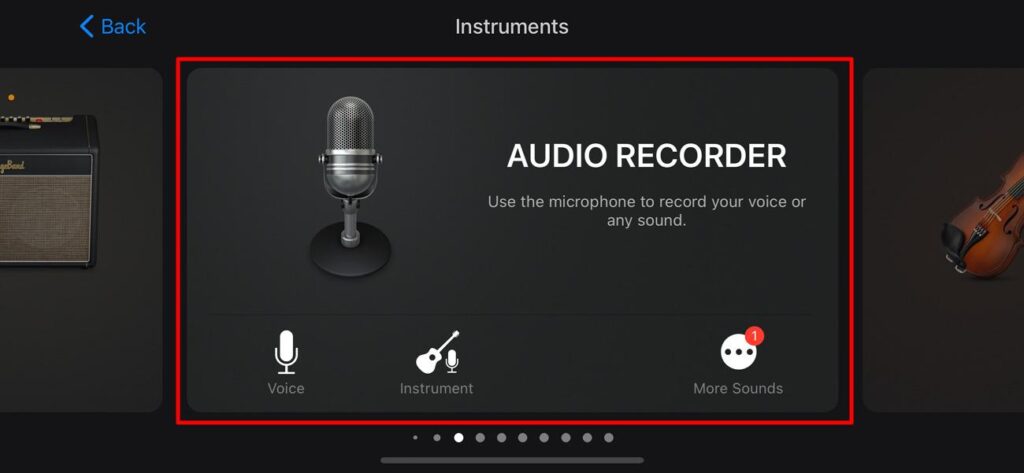
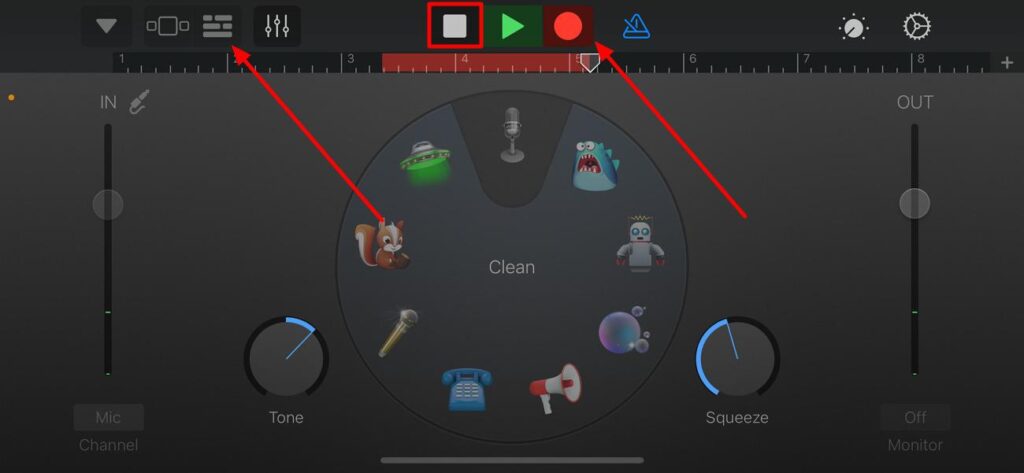
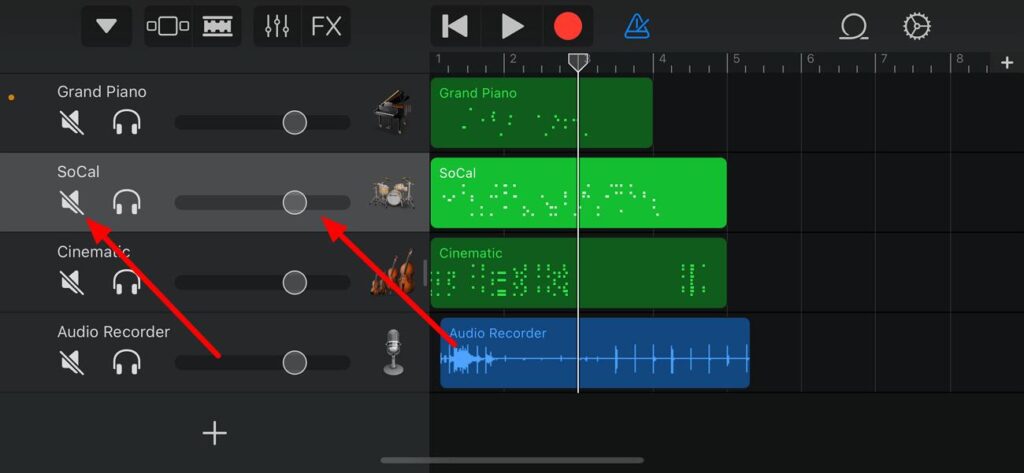
With technological advancement, music producers can now compose and mix songs without real instruments. Using digital audio workstations, they have the ability to generate innovative sounds with built-in loops and sample libraries. Moreover, modern DAWs contain virtual instruments that help you utilize your musical prowess to create ear-pleasing music. Once music tracks and vocals are added to a song, you can use these workstations to mix and master the sound. One such music workstation is GarageBand, which helps music composers create professional music with multiple features. Throughout this article, we will assist you in getting a good understanding of the song-mixing capabilities of this audio workstation. Professional composers must be familiar with GarageBand, which is one of the most efficient DAWs available for music production. With this audio workstation, you feel like working in a high-budget music studio. Using this software, you get access to a complete sound library, including instruments, samples, and loops. Moreover, this instrument even allows you to plug in real musical instruments to create and record music. However, people who don’t have access to professional instruments can utilize this software to generate songs with virtual tools, such as drums, guitars, and pianos. In addition, you can take advantage of its loop library to experiment with newer genres, including EDM and Hip-Hop. While using this platform, you can benefit from its collection of guitar and piano lessons to improve your music production skills. After getting the general introduction to the GarageBand audio workstation, let’s move towards discussing how it works. First, we will discuss how to utilize this software to create and mix songs on your Mac device. With its simple interface, anyone can make songs for personal and professional use cases. You just need to have basic knowledge of musical instruments and audio sampling to generate masterpieces through this virtual workstation. Using its built-in library and loops, you can add an innovative touch to your musical pieces. As discussed, you can connect your instruments or utilize virtual ones to create music based on your preferences. Go through the detailed steps explained below to create a song with a perfectly mixed and mastered sound: After launching this audio workstation on your macOS device, you will have access to its main interface with several options to create your first song. From here, you need to click the “Empty Project†option from the “New Project†tab to access the pop-up dialog box with further selections to start making music. Upon accessing this “Choose a Track Type†dialog box, select your preferred music instrument to begin the music production process. Here, we will choose the “Drummer†option, as this selection will play the drum automatically throughout the song. Finally, hit the “Create†button to add this instrument to your editing timeline. Once you have added the drummer to your song, press the “+†icon on the left side of your screen to access the “Choose a Track†window again. Now, choose the “Keyboard†option from the “Software Instrument†section to add a piano to your music piece. Now, click the “Create†button to add this instrument to your song successfully. Moving forward, choose the type of piano you want to use from the “Library†side window. Next, access the virtual keyboard on this tool through the “Window†tab on top of the screen. Finally, play and record the keys to add an innovative sound to your song. Upon adding all your favorite instruments to the workspace, click on the “Loops†icon on the top-right of your screen. Now, access the “Instrument†tab to select your desired instrument to further reveal more loops. Next, simply drag and drop your desired loop on the editing timeline to add this loop for creative song production. Now, you have finalized all the instrumentals to give a personalized sound to your song. Next, hit the “+†icon to access the “Choose a Track Type†dialog box on your screen again. From here, press the “Record Using a Microphone†option from the “Audio†tab. Moreover, you also need to choose the “Input†option to add your desired microphone as the recording device before you click on the “Create†button. After you select the audio option, start the voice recording process by clicking the “Start†icon on the top toolbar. You can press the “Spacebar†key to stop and start the recording to have intervals during the process. Once you are done recording, the recorded voice will be added to the workspace. Finally, you can move forward to mix and master your song after adding all the instruments and recorded voice. For this purpose, you first need to access the “Library†window to add different effects to the selected track. For example, you can change the vocals by selecting your desired option via the “Voice†drop-down menu. Afterward, you can manually add echo and reverb to get the desired effect. You can repeat the same procedure for all the remaining instruments. In addition, you can control the volume of each added track to avoid overlapping different elements in the songs. While doing so, hit the “Play†icon to preview the effects of changes you make to the track. You can keep on adjusting the volume and adding effects till you get a fully synchronized audio track. Besides macOS, this creative audio workstation is also available on iDevices to help composers generate music anywhere they want. Users can utilize multiple instruments to create fun songs on their mobile without needing external equipment. With its touch-and-play instruments, you can record your desired sounds with complete creative freedom. Plus, you get access to various voices while recording your audio for songs. Furthermore, you can manually play around with your voice to perfectly sync the recorded audio with the instruments. Upon combining audio and music, you can also adjust the plug-ins and master effects settings to mix and master the song. Let’s go through the steps given below to learn how to utilize GarageBand to create songs on iPad or iPhone: First, you need to download GarageBand on your iOS/iPadOS device through the App Store. Upon successful installation, launch this audio workstation on your mobile and hit the “+†icon from its main interface to start the music production process. After pressing this button, you will reach a new screen from where you need to tap the “Tracks†tab to access various instruments. Now, swipe left or right to find your desired instrument to begin this song-creation task. Here, we will start with the “Keyboard†instrument to add piano tunes to our song. Once you access the keyboard on your screen, hit the “Start†icon on the top toolbar to record the played instrument. Now, play and record your desired piano keys through the keyboard on your screen. Moreover, you can get help from several other options to customize the tune of this instrument. Once you are done recording, hit the “Stop†icon to save the recorded sound before pressing the “Workstation†icon to access the editing timeline. Upon accessing the workstation, you will see the recorded piano tunes added to the editing timeline. Then, tap the “+†icon on the bottom-left of your screen to access more instruments. Moving forward, swipe left to find your desired musical tool from the “Instrument†window. Here, we will add “Drums†to the song to give it a modern touch. Now, repeat the same process we followed while recording the keyboard tunes. To do so, you need to hit the “Start†icon before playing the drum beats to record the sound. After you finish the recording session, press the “Workstation†icon to go back to the song-creation workspace. You can follow the same procedure explained above to add as many instruments as you want to give an experimental sound to your songs. Upon reaching the workstation window, press the “+†icon to add your voice to the song. From the “Instruments†window, swipe left to find your desired option for voice recording. Here, you need to tap the “Audio Recorder†option to reach a voice-recording screen. Afterward, select your desired voice effect before pressing the “Start†icon to capture your voice. While recording the voice, you can adjust the “Tone†and “Squeeze†values to apply the desired effect. Upon finishing the audio recording, press the “Stop†icon before tapping the “Workstation†icon to reach the song editing screen. On this song-editing workspace, swipe right from the left of your screen to access a new set of settings. From here, you can control the volume of each track to avoid the overlapping sounds creating a mess. Moreover, you can further choose to mute some added tracks to get a clear sound of your desired element. After selecting your desired track, hit the “Mixer†icon to access new settings and mix the added elements further. Moving forward, you can adjust the “Compressor†and “Bass†values from the “Plug-ins & EQ†section. To make the sound more cohesive, play around with the “Echo†and “Reverb†settings from the “Master Effects†section. Following all these steps, you will be able to mix and master your song in a professional manner. Upon understanding the workings of this professional audio workstation, it is time to go through some valuable tips to create music on GarageBand. Musicians can surely improve the output of their songs by applying these minor adjustments. Therefore, let’s analyze all these points one by one to improve the way you create songs using this efficient song-creation workspace: All in all, GarageBand is the perfect tool for professionals and beginners to create innovative music. With its easy-to-navigate audio workstation, anyone can easily add instruments and loops to their songs with an optimized song-making experience. So, if you are a budding music producer, we recommend you add this DAW to your workflow to improve the way you create and mix songs. 1. Is there an autotune feature in GarageBand? Yes, music producers can easily auto-tune the voice of the singers while mixing songs in the GarageBand audio workstation. Using the help of the “Pitch Correction†feature, you can apply the desired effects to the voice for tonal corrections. 2. Can You Use GarageBand on Windows or Android devices? Currently, users don’t have the option to utilize this audio workstation on Android or Windows devices. However, Windows users can install virtual macOS on their system to use GarageBand for song production. 3. What is the best alternative to GarageBand for Windows? There are many available options for Windows users to record, edit, and mix songs without any limitations. However, FL Studio proves to be the best alternative to GarageBand with its multi-functional interface. With the help of this DAW, users can create music compositions without any external instruments. 4. Can we use samples and loops present in GarageBand for commercial purposes? Music composers can add the loops and samples in GarageBand to their tracks for commercial distribution. In addition, you don’t have to pay any royalty to utilize these loops within your tracks without copyright issues. However, you cannot distribute the individual loops to get financial benefits.  Dual Axis Solar Tracker System Dual Axis Solar Tracker System,Sun Power Single Axis Solar Tracker,Dual Axis Solar Sun Tracker pv tracker,Pv Solar Tracking System Hebei Jinbiao Construction Materials Tech Corp., Ltd. , https://www.pvcarportsystem.comGarageBand Audio Workstation – A General Overview Â
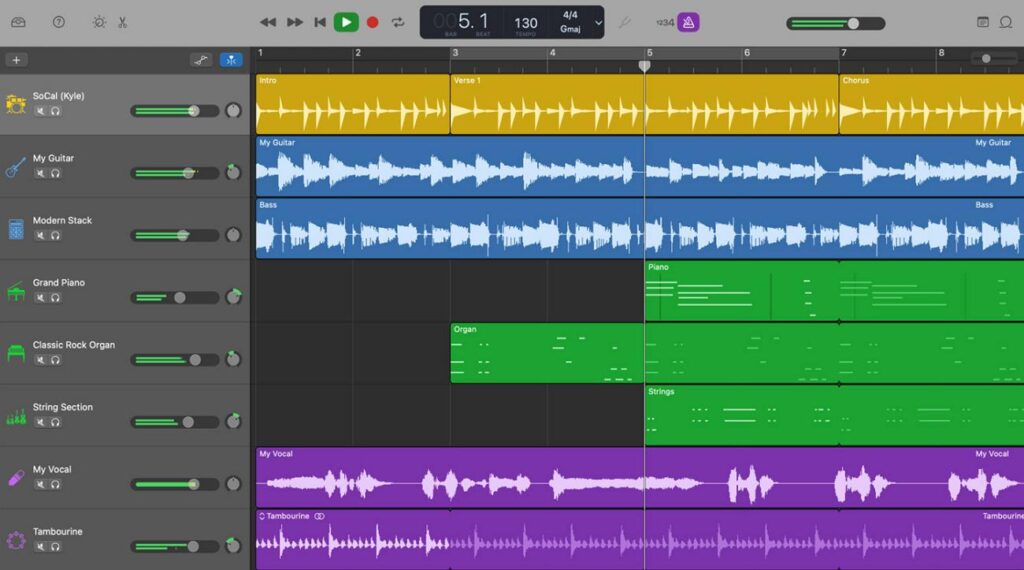
How to Mix Music While Creating Songs Using GarageBand on Mac? Â
Step 1. Create a New Project on the GarageBand Music WorkstationÂ
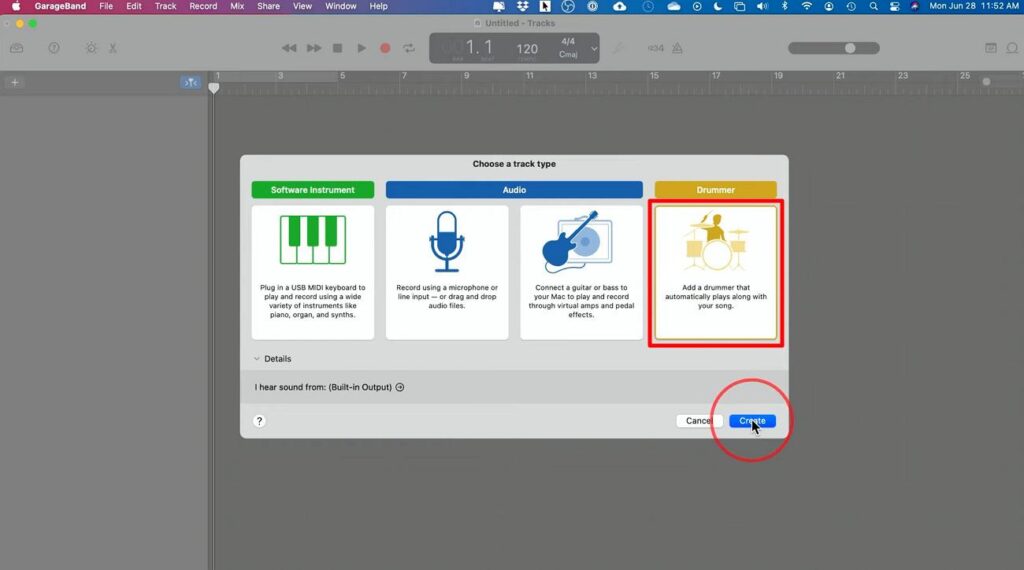
Step 2. Add More Instruments for Innovative Song CreationÂ
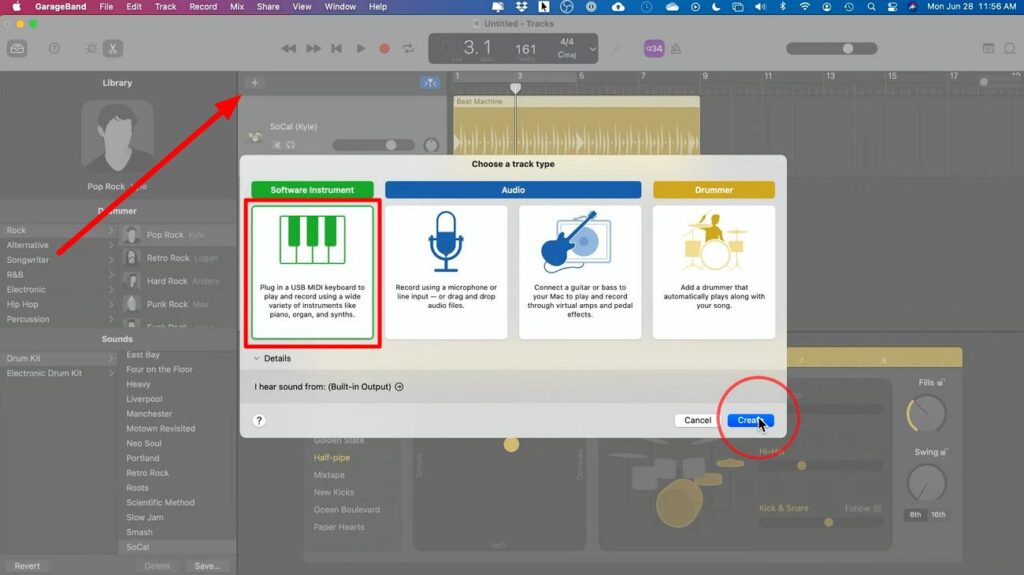
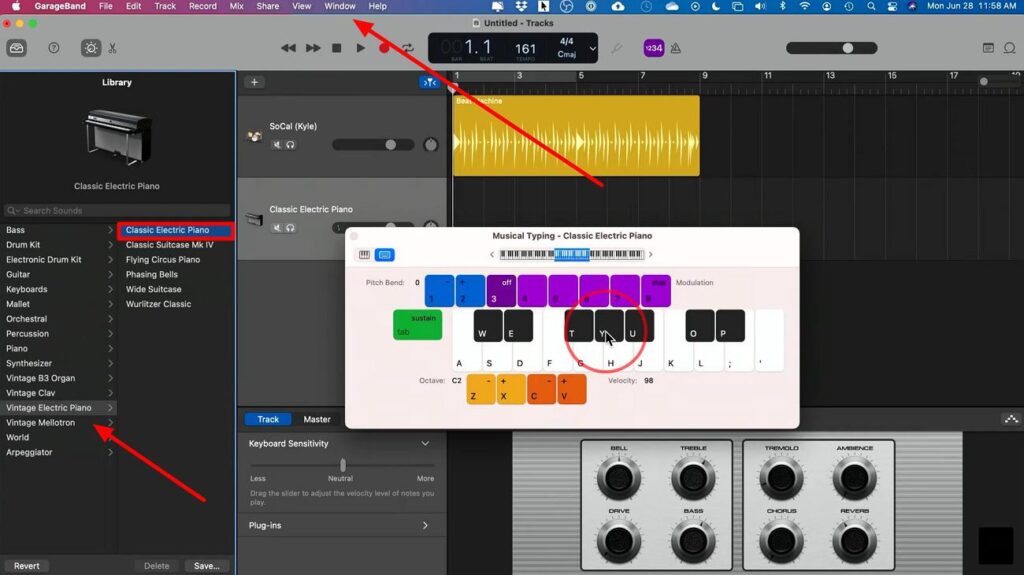
Step 3. Insert Loops to Your Music PieceÂ
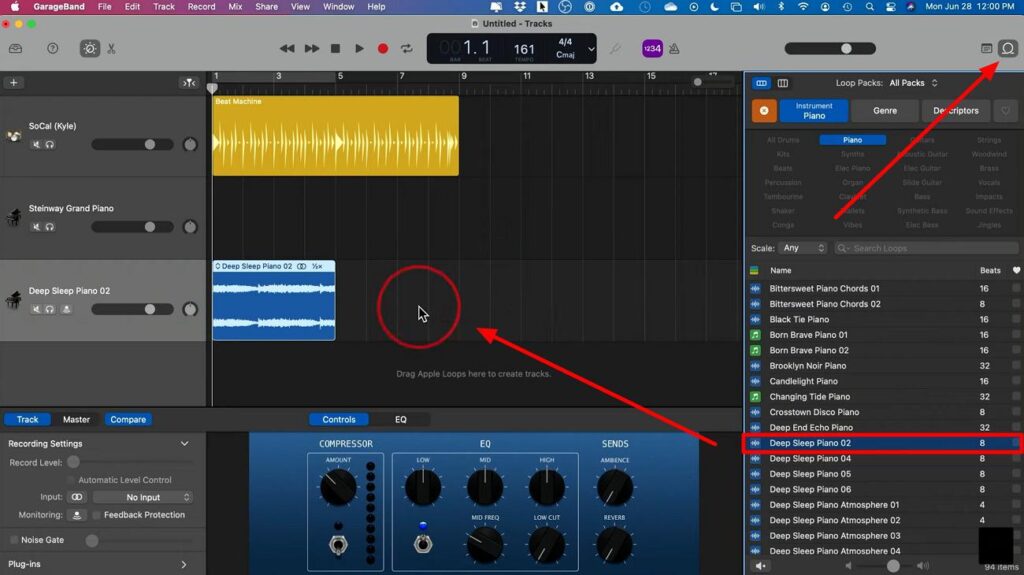
Step 4. Add Vocals to the Music for Song CreationÂ
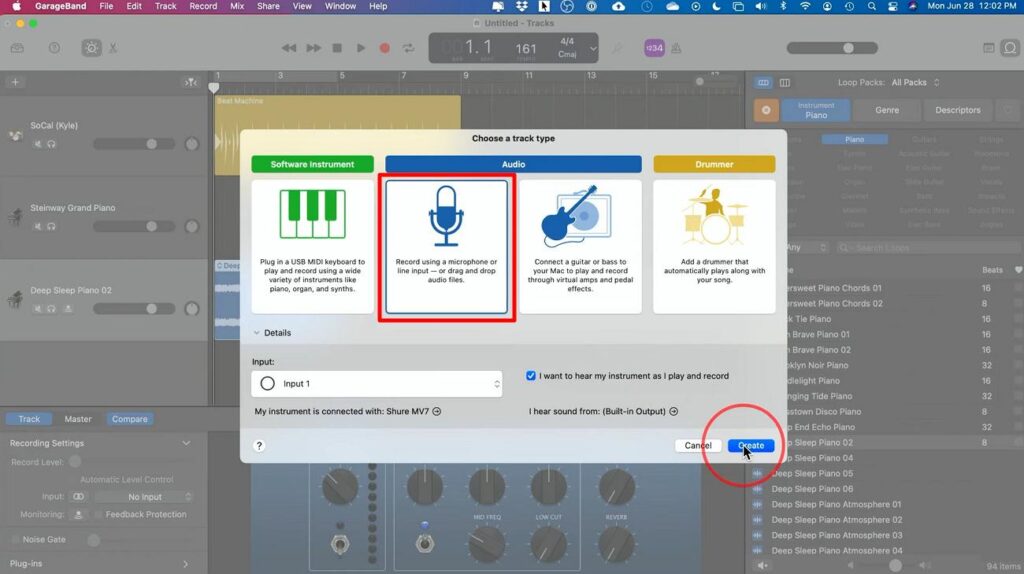
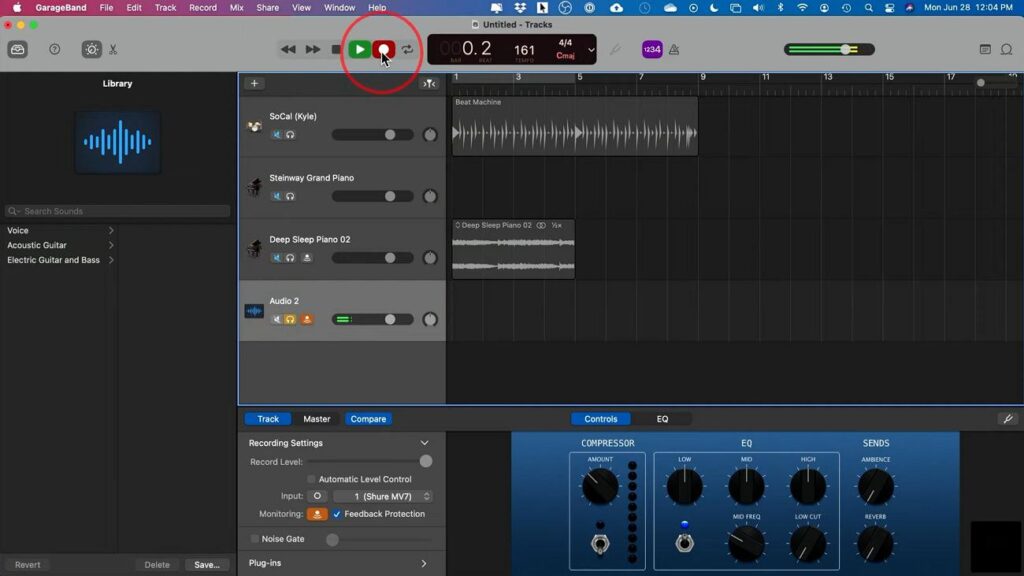
Step 5. Mix Your Song with Effects and Volume AdjustmentsÂ
How to Mix Songs with GarageBand on iPad/iPhone?Â
Step 1. Start a New Song Production Process
Step 2. Select an Instrument and Record Music
Step 3. Add More Instruments to Experiment with the SoundÂ
Step 4. Insert Vocals into the Newly Created MusicÂ
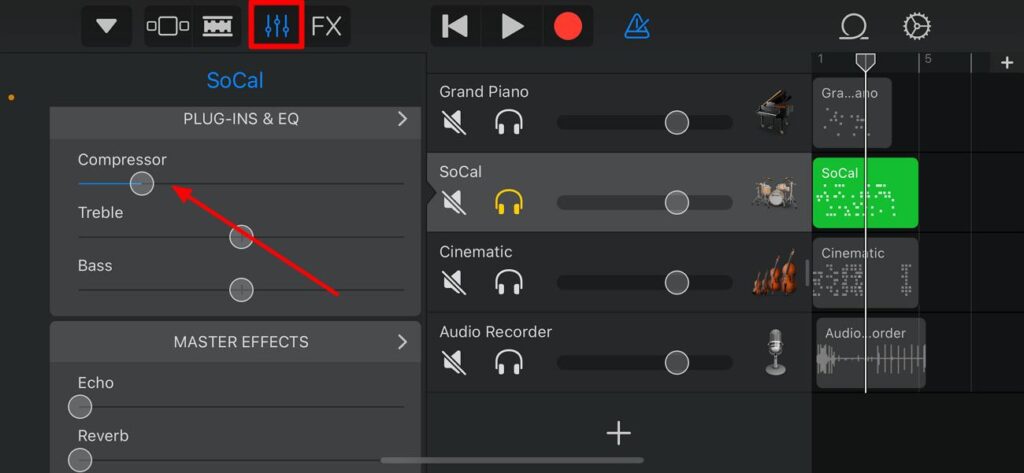
Step 5. Mix the Added Tracks to Avoid Overlapping Sounds
Tips to Professionally Mix Songs in GarageBand
ConclusionÂ
FAQs