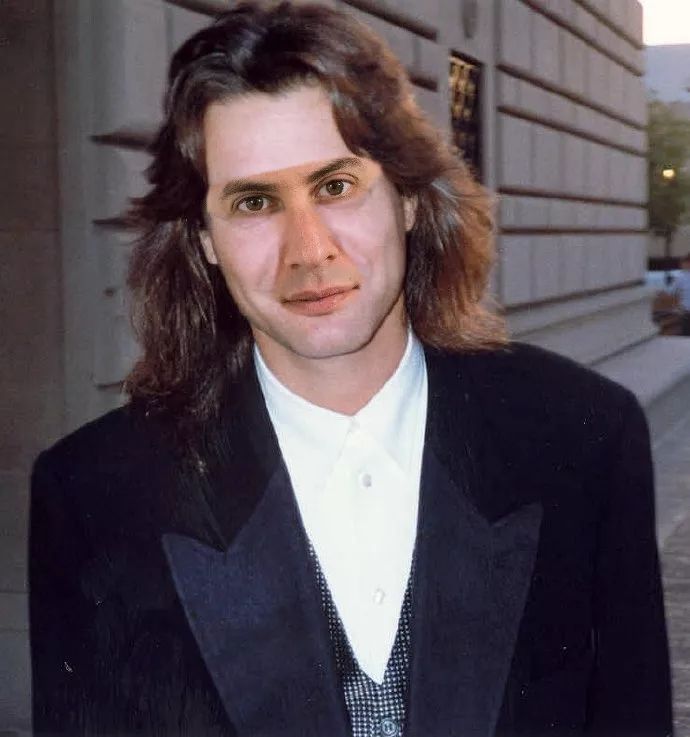
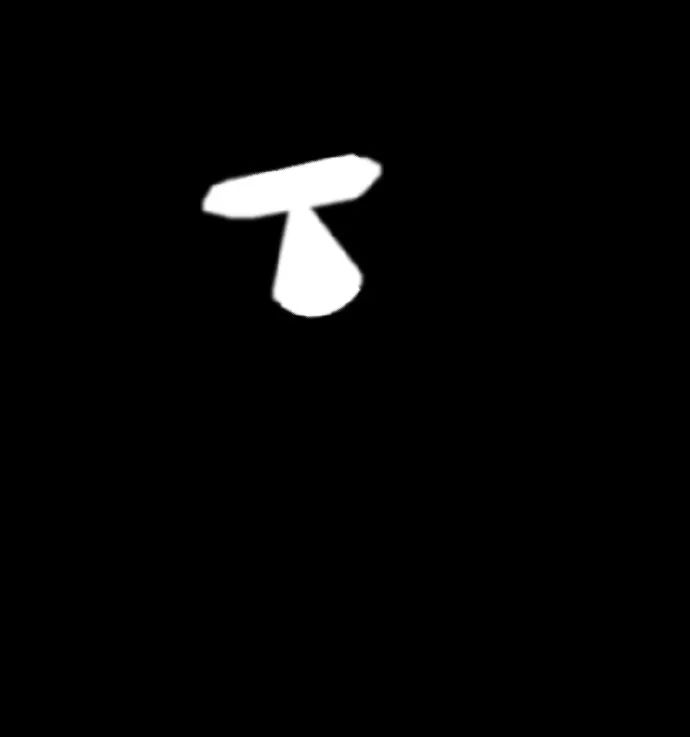
Introduction In this article I will describe how to write a brief (200 lines) Python script to automatically replace the face of one picture with the face of another picture. This process is divided into four steps: Detect face marks. Rotate, zoom, pan, and second picture to match the first step. Adjust the color balance of the second picture to fit the first picture. Mix the characteristics of the second image in the first image. The public number replies in the background: "change face" and obtain the complete code of the program. 1. Use dlib to extract face tags The script uses dlib's Python binding to extract face tags: Dlib implements the algorithms in Vahid Kazemi and Josephine Sullivan's article "Using Regression Trees in One Millisecond Face Alignment." The algorithm itself is very complicated, but the dlib interface is very simple to use: PREDICTOR_PATH ="/home/matt/dlib-18.16/shape_predictor_68_face_landmarks. The get_landmarks() function converts an image into a numpy array and returns a matrix of 68×2 elements. Each feature point of the input image corresponds to an x,y coordinate of each row. The feature extractor requires a rough bounding box as the algorithm input, provided by a traditional face detector that returns a list of rectangles, each of which corresponds to a face in the image. 2. Use Procrustes analysis to adjust the face We now have two marker matrices, each with a set of coordinates corresponding to a particular facial feature (eg, the coordinates of line 30 correspond to the nose). We now need to solve how to rotate, translate, and scale the first vector so that they fit as closely as possible to the point of the second vector. One idea is to overwrite the second image on the first image with the same transformation. Mathematically this problem, looking for T, s, and R, makes the following expression: The result is minimal, where R is a 2x2 orthogonal matrix, s is a scalar, T is a two-dimensional vector, and pi and qi are the rows of the above labeled matrix. It turns out that this type of problem can be solved with the "normal Procrustes analysis": Deftransformation_from_points(points1, points2): The code implements these steps: 1. Convert the input matrix to floating point. This is the basis for follow-up operations. 2. Each point set minus its centroid. Once an optimal scaling and rotation method has been found for the set of points, these two centroids c1 and c2 can be used to find a complete solution. 3. Similarly, each set of points is divided by its standard deviation. This eliminates the problem of component scaling deviations. 4. Use singular value decomposition to calculate the rotation part. Details on solving orthogonal Procrustes issues can be found on Wikipedia. 5. Use affine transformation matrix to return the complete transformation. The result can be inserted into OpenCV's cv2.warpAffine function, which maps image 2 to image one: Def warp_im(im, M, dshape): The alignment result is as follows: 3. Correct the color of the second image If we try to directly cover facial features, we will soon see this problem: The problem is that the different skin tones and light between the two images cause the edges of the coverage area to be discontinuous. We try to fix: COLOUR_CORRECT_BLUR_FRAC =0.6LEFT_EYE_POINTS = list(range(42,48))RIGHT_EYE_POINTS = list(range(36,42))def correct_colours(im1, im2, landmarks1): The result is as follows: This function tries to adapt im1 by changing the color of im2. It divides im2's Gaussian ambiguity by im2 and then multiplies im1's Gaussian ambiguity. The idea here is to scale with RGB scaling, but instead of using the overall constant scale factor for all images, each pixel has its own local scale factor. In this way the difference in light between the two images can only be corrected to some extent. For example, if the image 1 is illuminated from one side but the image 2 is uniformly illuminated, the color-corrected image 2 also suffers from the problem that the unlit side is darker. In other words, this is a rather crude approach, and the key to solving the problem is an appropriate Gaussian kernel function size. If it is too small, the facial features of the first image will be displayed in the second image. Too large, pixels outside the kernel are overlaid and discolored. The kernel here uses a pupil distance of 0.6 *. 4. Mix the features of the second image in the first image Use a mask to select which part of image 2 and image 1 should be the final displayed image: A value of 1 (displayed as white) is where the image 2 should appear, and a value of 0 (displayed as black) is where the image 1 should appear. Values ​​between 0 and 1 are the mixed regions of Image 1 and Image 2. Here is the code that generates the above figure: LEFT_EYE_POINTS = list(range(42,48))RIGHT_EYE_POINTS = list(range(36,42)) We decomposed the above process: The definition of get_face_mask() is to generate a mask for an image and a mark matrix. It draws two white convex polygons: one is the area around the eyes, and the other is the area around the nose and mouth. Then it is feathered out of the outer edge of the mask by 11 pixels to help hide any discontinuity. Such a mask is generated for both images at the same time. Using the same transformation as in step 2, the mask of image 2 can be converted into the coordinate space of image 1. Afterwards, the two masks are combined into one by an element-wise maximum. The purpose of combining these two masks is to ensure that the image 1 is masked and the characteristics of the image 2 appear. Finally, use the mask to get the final image: Output_im= im1 * (1.0-combined_mask) + warped_corrected_im2 * combined_mask Complete link: Import cv2import dlibimport numpyimport sysPREDICTOR_PATH ="/home/matt/dlib-18.16/shape_predictor_68_face_landmarks. Semi-Automatic Washing Machine Spin Motor Semi-Automatic Washing Machine Spin Motor,Motor For Wash Machine,Al Wire Spin Motor,Semi Automatic Washing Machine Dryer Motor WUJIANG JINLONG ELECTRIC APPLIANCE CO., LTD , https://www.jinlongmotor.com
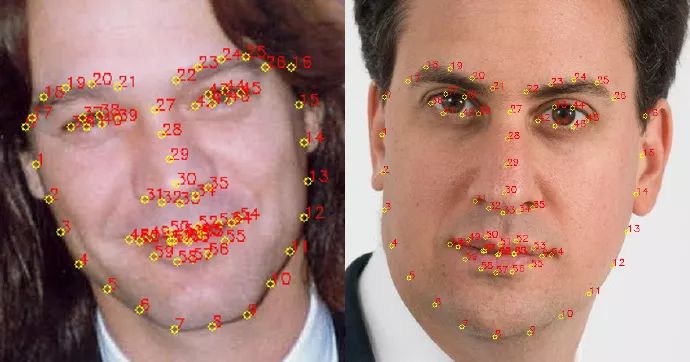
Dat"detector = dlib.get_frontal_face_detector()predictor = dlib.
Shape_predictor(PREDICTOR_PATH)defget_landmarks(im):
Rects = detector(im,1) iflen(rects) >1:
raiseTooManyFaces iflen(rects) ==0:
raiseNoFaces returnnumpy.matrix([[px, p.
y]forpinpredictor(im, rects[0]).parts()]) 
Points1 = points1.astype(numpy.float64)
Points2 = points2.astype(numpy.float64)
C1 = numpy.mean(points1, axis=0)
C2 = numpy.mean(points2, axis=0)
Points1 -= c1
Points2 -= c2
S1 = numpy.std(points1)
S2 = numpy.std(points2)
Points1 /= s1
Points2 /= s2
U, S, Vt = numpy.linalg.svd(points1.T *
Points2)
R = (U * Vt).T
Returnnumpy.vstack([numpy.hstack(((s2 / s1) * R,
c2.T - (s2 / s1) * R * c1.T)),
Numpy.matrix([0.,0.,1.])])
Output_im = numpy.zeros(dshape, dtype=im.dtype) cv2.warpAffine(im,
M[:2],
(dshape[1], dshape[0]),
Dst=output_im,
borderMode=cv2.BORDER_TRANSPARENT,
Flags=cv2.WARP_INVERSE_MAP) returnoutput_im 
Blur_amount = COLOUR_CORRECT_BLUR_FRAC * numpy.linalg.norm(
Numpy.mean(landmarks1[LEFT_EYE_POINTS], axis=0) -
Numpy.mean(landmarks1[RIGHT_EYE_POINTS], axis=0))
Blur_amount =int(blur_amount) ifblur_amount %2==0:
Blur_amount +=1 im1_blur = cv2.GaussianBlur(im1, (blur_amount, blur_amount),0)
Im2_blur = cv2.GaussianBlur(im2, (blur_amount, blur_amount),0)
# Avoid divide-by-zero errors. im2_blur +=128* (im2_blur <=1.0)
Return(im2.astype(numpy.float64) * im1_blur.astype(numpy.float64)
/
Im2_blur.astype(numpy.float64)) 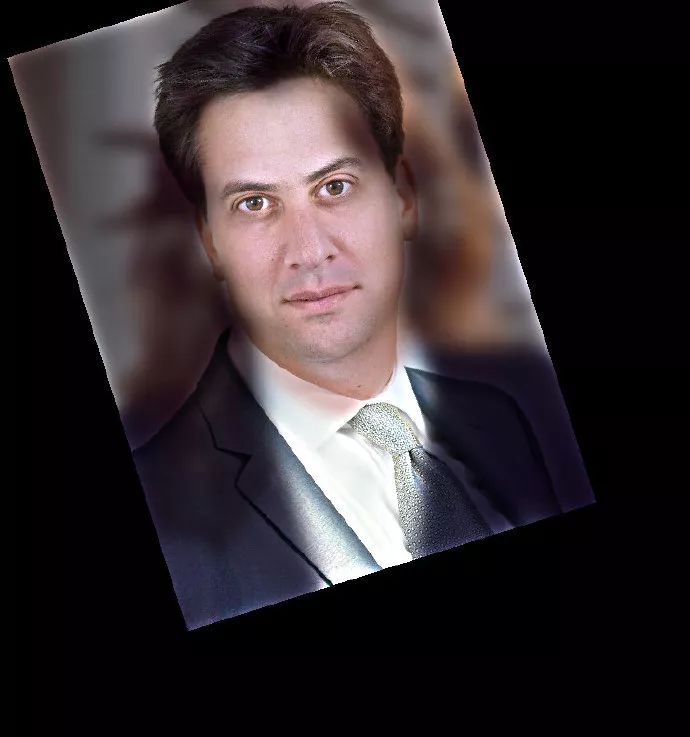
LEFT_BROW_POINTS = list(range(22,27))RIGHT_BROW_POINTS = list(range(17,22))
NOSE_POINTS = list(range(27,35))MOUTH_POINTS = list(range(48,61))
OVERLAY_POINTS = [LEFT_EYE_POINTS + RIGHT_EYE_POINTS + LEFT_BROW_POINTS + RIGHT_BROW_POINTS,
NOSE_POINTS + MOUTH_POINTS,]FEATHER_AMOUNT =11def draw_convex_hull(im, points, color):
Points = cv2.convexHull(points)
cv2.fillConvexPoly(im, points, color=color)def get_face_mask(im, landmarks):
Im = numpy.zeros(im.shape[:2], dtype=numpy.float64)
Forgroup in OVERLAY_POINTS:
Draw_convex_hull(im,
Landmarks[group],
Color=1) im = numpy.array([im, im, im]).transpose((1,2,0))
Im = (cv2.GaussianBlur(im, (FEATHER_AMOUNT, FEATHER_AMOUNT),0) >0) *1.0
Im = cv2.GaussianBlur(im, (FEATHER_AMOUNT, FEATHER_AMOUNT),0)
Returnimmask = get_face_mask(im2, landmarks2)warped_mask = warp_im(mask, M,
Im1.shape)combined_mask = numpy.max([get_face_mask(im1, landmarks1),
Warped_mask],
Axis=0) 
Dat"SCALE_FACTOR =1FEATHER_AMOUNT =11FACE_POINTS =list(range(17,68))MOUTH_POINTS =list(range(48,61))
RIGHT_BROW_POINTS =list(range(17,22))LEFT_BROW_POINTS =list(range(22,27))
RIGHT_EYE_POINTS = list(range(36,42))LEFT_EYE_POINTS = list(range(42,48))NOSE_POINTS = list(range(27,35))JAW_POINTS = list(range(0,17))#
Points usedtolineupthe images.ALIGN_POINTS = (LEFT_BROW_POINTS + RIGHT_EYE_POINTS + LEFT_EYE_POINTS +
RIGHT_BROW_POINTS + NOSE_POINTS + MOUTH_POINTS)#
Points from the second imagetooverlayonthefirst.
The convex hull of each# element willbeoverlaid.
OVERLAY_POINTS = [LEFT_EYE_POINTS + RIGHT_EYE_POINTS + LEFT_BROW_POINTS + RIGHT_BROW_POINTS, NOSE_POINTS + MOUTH_POINTS,]
# Amount of blurtouse during the colour correction,asafraction of the#
Pupillary distance.COLOUR_CORRECT_BLUR_FRAC =0.6detector = dlib.get_frontal_face_detector()predictor = dlib.
Shape_predictor(PREDICTOR_PATH) class TooManyFaces(Exception):
Passclass NoFaces(Exception):
Passdef get_landmarks(im):
Rects = detector(im,1) iflen(rects) >1:
Raise TooManyFaces iflen(rects) ==0:
Raise NoFaces returnnumpy.matrix([[px,py]forpin predictor(im, rects[0]).
Parts()])def annotate_landmarks(im, landmarks): im=im.copy() foridx, point in enumerate(landmarks):
Pos = (point[0,0], point[0,1])
cv2.putText(im, str(idx), pos,
fontFace=cv2.FONT_HERSHEY_SCRIPT_SIMPLEX,
fontScale=0.4,
Color=(0,0,255))
Cv2.circle(im, pos,3, color=(0,255,255)) returnimdef draw_convex_hull(im, points, color):
Points = cv2.convexHull(points) cv2.fillConvexPoly(im, points, color=color)def get_face_mask(im, landmarks): im= numpy.zeros(im.shape[:2], dtype=numpy.float64) forgroup in OVERLAY_POINTS:
Draw_convex_hull(im,
Landmarks[group],
Color=1) im= numpy.array([im,im,im]).transpose((1,2,0))
Im= (cv2.GaussianBlur(im, (FEATHER_AMOUNT, FEATHER_AMOUNT),0) >0) *1.0 im= cv2.GaussianBlur(im, (FEATHER_AMOUNT, FEATHER_AMOUNT),0) returnimdef transformation_from_points(points1, points2):
""" Returnanaffine transformation [s * R | T] such that:
Sum ||s*R*p1,i + T - p2,i||^2 isminimized. """
# Solve the procrustes problem by subtracting centroids, scaling by the
# standard deviation,andthen using the SVDtocalculate the rotation. See
# the followingformore details:
# https://en.wikipedia.org/wiki/Orthogonal_Procrustes_problem
Points1 = points1.astype(numpy.float64)
Points2 = points2.astype(numpy.float64)
C1 = numpy.mean(points1, axis=0)
C2 = numpy.mean(points2, axis=0)
Points1 -= c1
Points2 -= c2
S1 = numpy.std(points1)
S2 = numpy.std(points2)
Points1 /= s1
Points2 /= s2
U, S, Vt = numpy.linalg.svd(points1.T * points2)
# The R we seekisin fact the transpose of the given given U * Vt.
This
#isbecause the above table assumes the matrix goesontheright
# (with row vectors) thenour solution requires the matrixtobeonthe
#left(with column vectors).
R = (U * Vt).T returnnumpy.vstack ([numpy.hstack(((s2 / s1) * R,
c2.T - (s2 / s1) * R * c1.T)),
Numpy.matrix([0.,0.,1.])])def read_im_and_landmarks(fname):
Im= cv2.imread(fname, cv2.IMREAD_COLOR) im= cv2.resize(im, (im.shape[1] * SCALE_FACTOR,
Im.shape[0] * SCALE_FACTOR))
s = get_landmarks(im) returnim, sdef warp_im(im, M, dshape): output_im = numpy.zeros(dshape, dtype=im.dtype)
cv2.warpAffine(im,
M[:2],
(dshape[1], dshape[0]),
Dst=output_im,
borderMode=cv2.BORDER_TRANSPARENT,
Flags=cv2.WARP_INVERSE_MAP) returnoutput_imdef correct_colours(im1, im2, landmarks1):
Blur_amount = COLOUR_CORRECT_BLUR_FRAC * numpy.linalg.norm(
Numpy.mean(landmarks1[LEFT_EYE_POINTS], axis=0) -
Numpy.mean(landmarks1[RIGHT_EYE_POINTS], axis=0))
Blur_amount =int(blur_amount) ifblur_amount %2==0:
Blur_amount +=1 im1_blur = cv2.GaussianBlur(im1, (blur_amount, blur_amount),0) im2_blur = cv2.GaussianBlur(im2, (blur_amount, blur_amount),0)
# Avoid divide-by-zero errors.
Im2_blur +=128* (im2_blur <=1.0) return(im2.astype(numpy.float64) * im1_blur.astype(numpy.float64) /
Im2_blur.astype(numpy.float64))im1, landmarks1 = read_im_and_landmarks(sys.argv[1])
Im2, landmarks2 = read_im_and_landmarks(sys.argv[2]) M = transformation_from_points(landmarks1[ALIGN_POINTS],
Landmarks2[ALIGN_POINTS]) mask = get_face_mask(im2, landmarks2)warped_mask = warp_im(mask, M, im1.shape) combined_mask = numpy.max([get_face_mask(im1, landmarks1), warped_mask],
Axis=0)warped_im2 = warp_im(im2, M, im1.shape)warped_corrected_im2 = correct_colours(im1, warped_im2, landmarks1)output_im = im1 *
(1.0-combined_mask) + warped_corrected_im2 *
Combined_maskcv2.imwrite('output.jpg', output_im)